This section describes how to switch the cross-connect mode of the OptiX OSN 9800 M24. I hope you like it.
Background knowledge
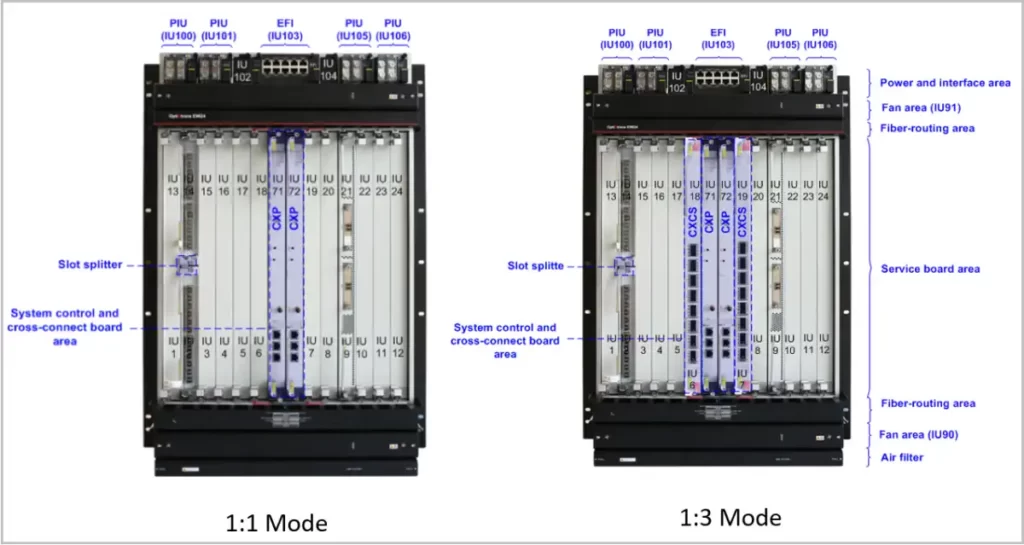
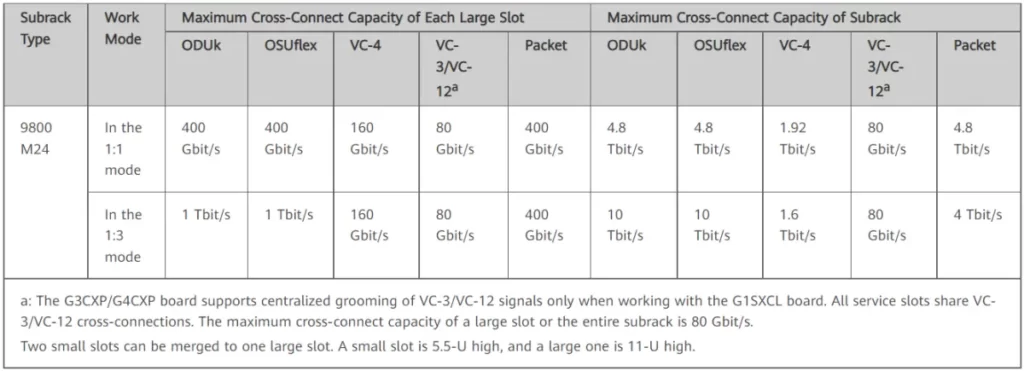
The OptiX OSN 9800 M24 subrack supports two cross-connect modes: 1:1 and 1:3. The two modes differ in the number of cross-connect boards, number of available slots for service boards, cross-connect capacity, and application scenarios.
Schematic diagram of the areas and slots:

Cross-connect capacity:

Check the status of NE before making changes
1. Check whether the NE version is V100R007C00 or later.
2. Check whether the physical CXCS board is in position and whether the logical CXCS board is added.
3. Check the status of the CXP and CXCS boards. When the CXP and CXCS boards work in 1:1 mode, the board work status value of CXP boards is active, and that of CXCS boards is Isolate.
the board good status value of CXP and CXCS boards is good.
4. Check the alarms and ensure that no HARD_ERR/HARD_BAD/TS_SYNC_FAIL alarm is generated.
5. Check the DC account status. If the DC account is not logged in, select an NE account as the DC account to log in to the NE.
6. Backing Up NE data.
The cross-connection mode is changed from 1:1 to 1:3
1. In the NE Toolbox dialog box, click Smooth Upgrade of Subrack Cross-connections area. Confirm the impact of the cross-connect mode change and start the operation. In the dialog box that is displayed, click Close.
In this case, the cross-connect mode is changed to the Transient state. In the Smooth Upgrade of Subrack Cross-connections dialog box, the Cancel Upgrade and Submit buttons are available.
2. In the Smooth Upgrade of Subrack Cross-connections dialog box, click Cancel Upgrade and Submit.
Rollback: After you click Cancel Upgrade, the M24 subrack keeps working in the 1:1 cross-connect mode.
Submission: After you click Submit, the M24 subrack is upgraded to the 1:3 cross-connect mode.
Querying the Current Cross-Connect Mode
1. Check the status of the four cross-connect boards. All the boards are in the Active and Good state.
2. Check the values of Cross-Connect Mode. The NE is in enhanced mode.
For the OptiX OSN 9800 M24, enhanced indicates that the subrack is in the 1:3 cross-connect mode and normal indicates that the subrack is in the 1:1 cross-connect mode.
3. Checking NE alarms. If the XCS_UPGRADE_UNCOMMIT alarm is cleared and displayed in green, the upgrade is successful.
The cross-connection mode is changed from 1:3 to 1:1
The 1:1 cross-connect mode can be restored only by clearing the database. During the process of restoring the 1:1 cross-connection mode by clearing the database, NE configuration data will be lost and services will be interrupted. Exercise caution when performing this operation.
1. At the NE Data Backup/Restoration page, right-click NE and choose Initialize Database from the shortcut menu.
2. After about 15 minutes (sometimes it may take longer), the operation is complete. In this case, all boards except the two system control and cross-connect boards are in the working state.
3. Uploading NE Data.
4. Setting the power supply.
5. Add all boards and upload the NE data again.
6. Check the cross-connect mode and cross-connect board status of the NE.

Leave a comment